Connect to the TRON Network
The TRON network is mainly divided into:
- Mainnet
- Nile Testnet
- Shasta Testnet (currently does not support node joining)
- Private Network
This guide explains how to configure the java-tron client to connect to these networks, covering basic network configuration, node discovery, node connection, log and node status verification, and how to troubleshoot connection issues.
Basic Network Configuration
You can connect a java-tron node to a specific network by modifying the following key items in the config file:
Network ID
The P2P Network ID(p2p.version) specifies the network you want to join. Mainnet configuration:
node {
  ...
  p2p {
    version = 11111        # Mainnet
  }
  ...
}
In particular:
- Mainnet: version =
11111 - Nile Testnet: version =
201910292 - Shasta Testnet: version =
1 - Private Network: Custom value (set to a different ID)
Genesis Block
The genesis.block configuration must be consistent with other nodes in the target network, otherwise the node will not be able to connect to peers. Mainnet configuration:
genesis.block = {
  # Reserve balance
  assets = [
    {
      accountName = "Zion"
      accountType = "AssetIssue"
      address = "TLLM21wteSPs4hKjbxgmH1L6poyMjeTbHm"
      balance = "99000000000000000"
    },
    {
      accountName = "Sun"
      accountType = "AssetIssue"
      address = "TXmVpin5vq5gdZsciyyjdZgKRUju4st1wM"
      balance = "0"
    },
    {
      accountName = "Blackhole"
      accountType = "AssetIssue"
      address = "TLsV52sRDL79HXGGm9yzwKibb6BeruhUzy"
      balance = "-9223372036854775808"
    }
  ]
  witnesses = [
    {
      address: THKJYuUmMKKARNf7s2VT51g5uPY6KEqnat,
      url = "http://GR1.com",
      voteCount = 100000026
    },
    {
      address: TVDmPWGYxgi5DNeW8hXrzrhY8Y6zgxPNg4,
      url = "http://GR2.com",
      voteCount = 100000025
    },
    {
      address: TWKZN1JJPFydd5rMgMCV5aZTSiwmoksSZv,
      url = "http://GR3.com",
      voteCount = 100000024
    },
    {
      address: TDarXEG2rAD57oa7JTK785Yb2Et32UzY32,
      url = "http://GR4.com",
      voteCount = 100000023
    },
    {
      address: TAmFfS4Tmm8yKeoqZN8x51ASwdQBdnVizt,
      url = "http://GR5.com",
      voteCount = 100000022
    },
    {
      address: TK6V5Pw2UWQWpySnZyCDZaAvu1y48oRgXN,
      url = "http://GR6.com",
      voteCount = 100000021
    },
    {
      address: TGqFJPFiEqdZx52ZR4QcKHz4Zr3QXA24VL,
      url = "http://GR7.com",
      voteCount = 100000020
    },
    {
      address: TC1ZCj9Ne3j5v3TLx5ZCDLD55MU9g3XqQW,
      url = "http://GR8.com",
      voteCount = 100000019
    },
    {
      address: TWm3id3mrQ42guf7c4oVpYExyTYnEGy3JL,
      url = "http://GR9.com",
      voteCount = 100000018
    },
    {
      address: TCvwc3FV3ssq2rD82rMmjhT4PVXYTsFcKV,
      url = "http://GR10.com",
      voteCount = 100000017
    },
    {
      address: TFuC2Qge4GxA2U9abKxk1pw3YZvGM5XRir,
      url = "http://GR11.com",
      voteCount = 100000016
    },
    {
      address: TNGoca1VHC6Y5Jd2B1VFpFEhizVk92Rz85,
      url = "http://GR12.com",
      voteCount = 100000015
    },
    {
      address: TLCjmH6SqGK8twZ9XrBDWpBbfyvEXihhNS,
      url = "http://GR13.com",
      voteCount = 100000014
    },
    {
      address: TEEzguTtCihbRPfjf1CvW8Euxz1kKuvtR9,
      url = "http://GR14.com",
      voteCount = 100000013
    },
    {
      address: TZHvwiw9cehbMxrtTbmAexm9oPo4eFFvLS,
      url = "http://GR15.com",
      voteCount = 100000012
    },
    {
      address: TGK6iAKgBmHeQyp5hn3imB71EDnFPkXiPR,
      url = "http://GR16.com",
      voteCount = 100000011
    },
    {
      address: TLaqfGrxZ3dykAFps7M2B4gETTX1yixPgN,
      url = "http://GR17.com",
      voteCount = 100000010
    },
    {
      address: TX3ZceVew6yLC5hWTXnjrUFtiFfUDGKGty,
      url = "http://GR18.com",
      voteCount = 100000009
    },
    {
      address: TYednHaV9zXpnPchSywVpnseQxY9Pxw4do,
      url = "http://GR19.com",
      voteCount = 100000008
    },
    {
      address: TCf5cqLffPccEY7hcsabiFnMfdipfyryvr,
      url = "http://GR20.com",
      voteCount = 100000007
    },
    {
      address: TAa14iLEKPAetX49mzaxZmH6saRxcX7dT5,
      url = "http://GR21.com",
      voteCount = 100000006
    },
    {
      address: TBYsHxDmFaRmfCF3jZNmgeJE8sDnTNKHbz,
      url = "http://GR22.com",
      voteCount = 100000005
    },
    {
      address: TEVAq8dmSQyTYK7uP1ZnZpa6MBVR83GsV6,
      url = "http://GR23.com",
      voteCount = 100000004
    },
    {
      address: TRKJzrZxN34YyB8aBqqPDt7g4fv6sieemz,
      url = "http://GR24.com",
      voteCount = 100000003
    },
    {
      address: TRMP6SKeFUt5NtMLzJv8kdpYuHRnEGjGfe,
      url = "http://GR25.com",
      voteCount = 100000002
    },
    {
      address: TDbNE1VajxjpgM5p7FyGNDASt3UVoFbiD3,
      url = "http://GR26.com",
      voteCount = 100000001
    },
    {
      address: TLTDZBcPoJ8tZ6TTEeEqEvwYFk2wgotSfD,
      url = "http://GR27.com",
      voteCount = 100000000
    }
  ]
  timestamp = "0" #2017-8-26 12:00:00
  parentHash = "0xe58f33f9baf9305dc6f82b9f1934ea8f0ade2defb951258d50167028c780351f"
}
Node Discovery
Enable Node Discovery
Node discovery is enabled or disabled via the configuration file. It is enabled by default:
node.discovery = {
  ...
  enable = true
  ...
}
Boot Nodes
Java-tron uses the Kademlia protocol to discover peers. Discovery requires boot nodes, which consist of seed nodes and actively configured peers, see Active Connection (Active Peers).
seed.node
seed.node is used to initialize connections. It should point to online and stable Fullnode:
seed.node = {
  ip.list = [
    "3.225.171.164:18888",
    "52.8.46.215:18888",
    ...
    "18.163.230.203:18888"
    #"[2a05:d014:1f2f:2600:1b15:921:d60b:4c60]:18888", // use this if support ipv6
    #"[2600:1f18:7260:f400:8947:ebf3:78a0:282b]:18888", // use this if support ipv6
  ]
}
seed.node list, refer to the official config file.
If your network interface supports IPv6, you can remove the comment symbol # in the list.
Persistent Nodes from Database
When persistence is enabled, nodes in the routing table are periodically written to the database and reused on restart:
node.discovery = {
  ...
  persist = true
  ...
}
18888:
node {
  ...
  listen.port = 18888
  ...
}
Disable Node Discovery
In some cases (e.g., local testing or a fixed private network), you may disable discovery by setting:node.discovery.enable = false or by blocking UDP port 18888 via firewall.
Node Connection
Number of Node Connections
node.maxConnections defines the maximum number of peer connections (default: 30). Higher values improve network joining and broadcasting efficiency but require more bandwidth and resources:
node {
  ...
  maxConnections = 30           # max connections
  ...
}
Active Connection (Active Peers)
Active peers come from three sources:
- Configured active peers (high priority). These connections are made regardless of discovery settings:
node {
  ...
  active = [
    # Active establish connection in any case
    # Sample entries:
    # "ip:port",
    # "ip:port"
  ]
  ...
 }
- Peers discovered via node discovery (medium priority)
- DNS tree nodes (low priority). Rarely used, requires
treeUrls:
dns {
...
# dns urls to get nodes, url format tree://{pubkey}@{domain}, default empty
treeUrls = [
  #"tree://AKMQMNAJJBL73LXWPXDI4I5ZWWIZ4AWO34DWQ636QOBBXNFXH3LQS@main.trondisco.net",
]
...
}
Compared with the traditional static seed node list, the DNS tree mechanism has advantages in P2P network bootstrapping, such as dynamic node updates and resistance to attacks.
It can be seen that currently, the target nodes for active connection only come from two categories: one is the configured active nodes, and the other is the connectable nodes obtained through node discovery.
Passive Connections
- The current node will always accept connection requests from nodes listed under
node.passive
node {
  ...
  passive = [
    # Passive accept connection in any case
    # Sample entries:
    # "ip:port",
    # "ip:port"
  ]
  ...
 }
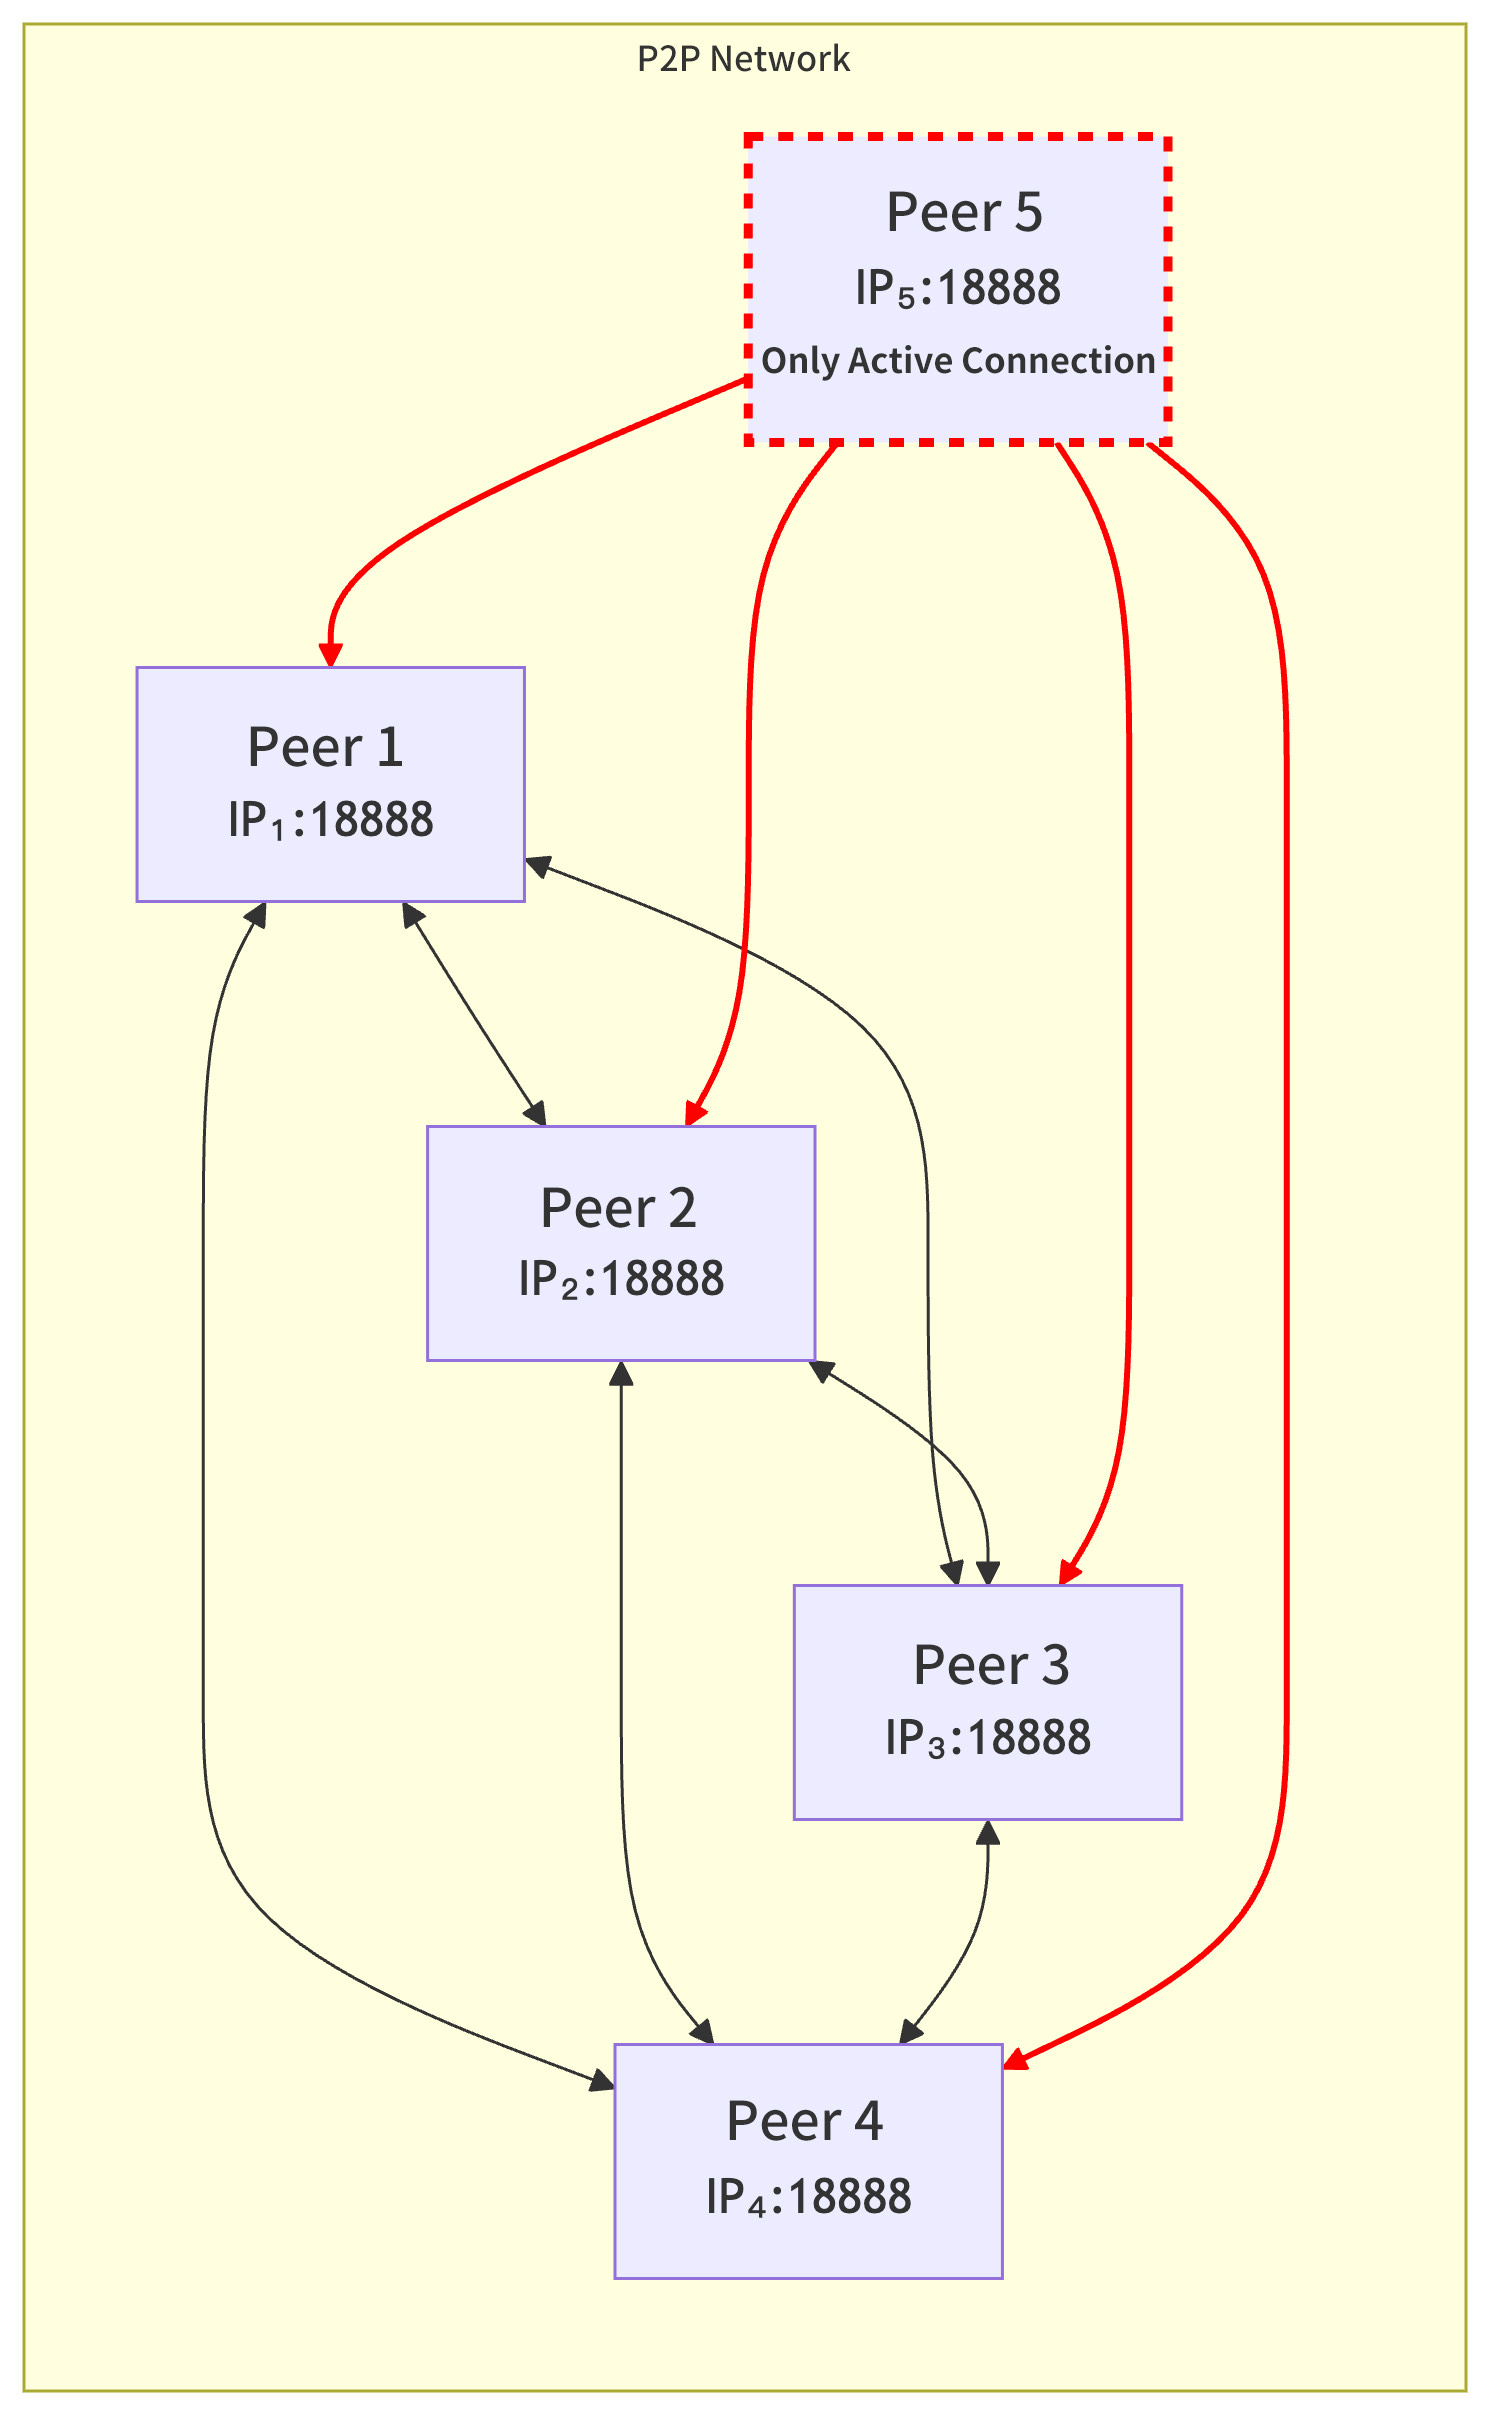
- Other nodes: While a node is discovering other nodes, it will also be discovered by other nodes, and these nodes may also initiate connections to the current node actively.
Unlike node discovery, which uses UDP, peer connections use Transmission Control Protocol (TCP) on the same port (18888 by default). However, the port number bound for passive connection is the same as that bound for node discovery. If a node does not want to accept passive connections for security reasons, it can close the TCP 18888 port through the firewall. If a node disables passive connections, the entire network topology will be as shown in the figure below:
Logs and Node Status Verification
View Sync Logs
TRON node logs are stored in logs/tron.log:
$ tail -f logs/tron.log
Example Sync Logs:
pushBlock block number:76, cost/txs:13/0 false
Success process block Num:76,ID:000000000000004c9e3899ee9952a7f0d9e4f692c7070a48390e6fea8099432f.
Example Block Production Logs (for Super Representatives):
Generate block 79336 begin
Generate block 79336 success, trxs:0, pendingCount: 0, rePushCount: 0, postponedCount: 0
Check Node Status
Use the HTTP API:
$ curl http://127.0.0.1:16887/wallet/getnodeinfo
{
  "activeConnectCount": 3,
    "beginSyncNum": 42518346,
    "block": "Num:42518365,ID:000000000288c75d1967232f1efe606ff90b9dd76660d7de8cc091849be6bf10",
    "cheatWitnessInfoMap": {
        ...
    },
    "configNodeInfo": {
        ...
        "codeVersion": "4.5.1",
        "dbVersion": 2,
        "discoverEnable": true,
        "listenPort": 18888,
        ...
    },
    "currentConnectCount": 18,
    "machineInfo": {
        ...
    },
    "passiveConnectCount": 15,
    "peerList": [
        ...
    ],
    "solidityBlock": "Num:42518347,ID:000000000288c74b723398aef104c585bad1c7cbade7793c5551466bd916feee",
    "totalFlow": 8735314
}
Verify Node Synchronization
Compare your local block height with TRONSCAN :
curl http://127.0.0.1:16887/wallet/getnowblock
Troubleshooting Common Connection Issues
There are occasions when java-tron simply fails to connect to peers. The common reasons for this are:
-
Local clock offset
Sync system time with:
sudo ntpdate -s time.nist.gov -
UDP blocked by firewall
Use
node.activeto specify fixed peers. -
Not accepting inbound connections
Configure
node.passiveto accept connections from trusted peers. -
Shasta Testnet unsupported
Use Nile Testnet instead.
Connecting to a Private Network
Developers can deploy a private instance of the TRON network.
Key Configuration:
- Use a custom
node.p2p.versionto avoid conflicts with existing public networks.
Reference Guide:
- Please refer to Private Network for full instructions.